
Welcome back Christina McKinney! Today Christina is sharing her tutorial for an absolutely stunning 'Back To School Tote' for an absolutely precious childhood occasion. A visit to the library is always one of the most precious places for a child to explore. Their eyes widen at the tall shelves packed with picture books and story books alike! We as parents love when their eyes sparkle as their imaginations take off. Your little reader will feel like a gem as they head to the library with their very own and very special 'Back To School Tote' featuring canvas and quilt weight poplin from the Acorn Trail collection by Teagan White.


This project was inspired by my oldest daughter who is a reading fanatic. We live in Texas...which means that it's either hot or really hot outside for most of the year. Our local library is definitely a favorite for days when we need to get out of the house, but it's just too hot to play outside. It's the perfect spot for all my little bookworms! Having their own special bags to fill with their library picks just makes it that much better. My daughter has already requested more bags in different colors because, you know, OPTIONS! Since these are a pretty quick sew, I'm sure I can humor her a few more.

*I used canvas for my outer print for durability. In place of canvas, you could also use cotton backed with iron-on stabilizer.
*I have you pinning in a few places throughout this tutorial, but I DO NOT recommend sewing over pins.
*Your seam allowance is 1/2in throughout unless otherwise stated.
Finished bag dimensions: 12in tall, 10in wide, 2in deep


Supplies needed:
Main fabric - 1/2yd Lining fabric - 1/2yd
Strap fabric - 1/4yd (I used the main print for my straps & velcro closure, so 3/4yd total)
Pocket fabric - fat quarter
Wording fabric - fat quarter
Iron on stabilizer - 1/4yd
Wonder Under - 11in X 6in piece
Velcro - 2in piece
Printable font template - Download it here!
Cut list:
Main fabric:
- (2) 14in wide X 14 1/2in tall
- (2) 21 1/2in long X 3 1/2in wide (Straps)
- (2) 5 1/2in long X 3in wide (Velcro closure)
Lining fabric: (2) 14in wide X 14 1/2in tall
Pocket fabric: (1) 5 1/2 wide X 5in tall
Wording fabric: (1) 11in wide X 6in tall
Iron on stabilizer: (2) 21 1/2in long X 1 1/4in wide
Wonder Under: (1) 11in X 6in

Let's get started!
Press all pieces before you begin.
Take one of your outer panel pieces and mark a 1 1/2 in square in each bottom corner.

I usually trace the square in pencil.

Cut out these notches on each of your outer panel pieces and each of your inner lining pieces. I usually stack them in pairs to cut them, it's faster that way.


Following the directions on your particular type, attach the 11in X 6in piece of wonder under to the WRONG side of your 11in X 6in piece of wording fabric.

Choose which lettering you would like & print it out. I used an X-Acto knife to cut all the inner pieces. After your lettering is cut out, you'll need to trace it onto your wonder under backed fabric. Be sure to trace the letters BACKWARDS on the wonder under so that they're facing the correct direction when you cut it out.

I used my X-Acto again for the inner curves - glad it was sharp enough to slice fabric!

Once you're done, flip it and your letters should be facing the right direction.

Next we'll assemble the inside pocket.


Flip the piece over and fold over another 3/4in to the right side. Pin in place. You don't want to press this edge because you'll be flipping it right side out shortly.

Using a 1/2in seam, stitch each side down on just the folded portion.

Flip your pocket right side out and press. The sides will naturally fold under leaving only the bottom edge raw.


Fold the bottom (raw) edge under 1/2in to the wrong side and press.

With the bottom seam pressed, your bottom corners should now have a small creased square.

Fold each bottom corner up forming a triangle. The point of the square will be the bottom of your fold. Press this edge.

With the bottoms folded up, refold your side seams and press.

Lastly you will refold your bottom seam and press.
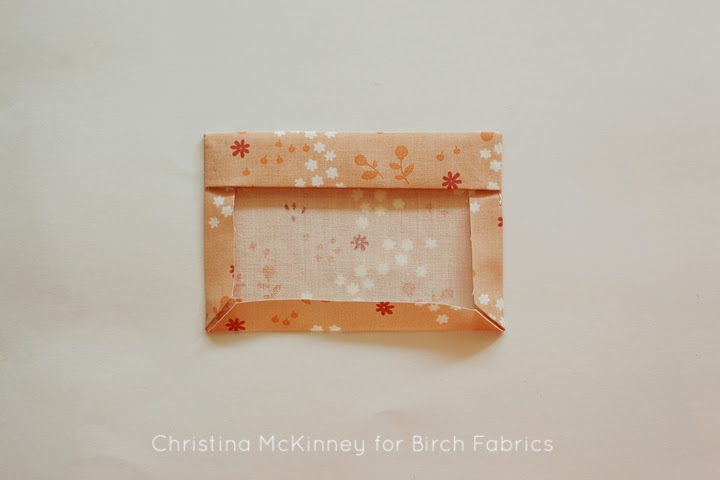
Press your pocket one more time and check that all your edges are folded correctly.

Topstitch along the top edge of the pocket & then 1/2in down from your first line of stitching.

Next you'll assemble the long straps.
Press the long sides of the strap piece 1/4in to the wrong side.

Fold the piece in half lengthwise with your folded edges together and press.

Open your pressed strap piece and insert your strip of iron on stabilizer under one side of the folded edge on the wrong side. (You can use a strip on both sides if you prefer.)

Refold the strap and iron your stabilizer in place. Repeat these steps to prep your second strap as well.

Topstitch along the edge of both strap pieces. The short edges are still raw, but they will be tucked into your seams later on.


Now we're going to assemble the small Velcro strap that closes the bag at the top.
Take one side of the Velcro strap and center one of the small Velcro pieces 1in from the bottom edge. Pin in place and sew.

You should now have one piece with Velcro & one without.

Put your strap pieces together, right sides facing. The edge with Velcro sewn on is the bottom edge.

Stitch along the sides and bottom using a 1/2in seam leaving the top edge open for turning. Once sewn, trim your seam allowances to 1/4in and clip the bottom 2 corners. Be careful not to cut through your stitching.

Turn the piece right side out using a chopstick or turning tool to gently poke out the corners. Topstitch along the sides and bottom seams.

This next step is optional, but I feel like it gives the bag a little more structure. Topstitch along the side and bottom edge of your bag pieces, 2in from the edge. (Not along the top)


Repeat this step for all 4 panel pieces. (You will later press along this topstitching, creating nice folded corners on your bag.)

Alright, just a couple more steps till you're ready to assemble the bag!
Take your lettering, peel off your paper backing, and position it on one of the outer panel pieces.
Am I weird? I love to peel the paper off....


Make sure you are within the topstitched lines (or if you didn't do the topstitching, make sure your lettering is at least 2in from each edge.) Iron your letters in place. Optional: Carefully topstitch around your lettering in a contrasting color for a decorative look.

Now, you'll attach the inner pocket to one of the inner panel pieces. I used a ruler to center my pocket 2 inches from the top and about 5in from each side edge.

Once positioned, pin your pocket in place, and stitch along the sides and bottom leaving the top edge open. No exact measurements for the stitching, just as close to the edge as you can get.


Now you're ready to assemble the panel pieces and complete the bag!
Take your outer panel pieces and lay them with right sides together. Stitch along the bottom edge using a 1/2in seam.

Open this piece flat and press your seam open.

After pressing, place your piece back together with right sides facing.

Stitch along each long side using a 1/2in seam allowance.

Press the side seams open as well.

After pressing the side seams, lay the pieces down with right sides facing. Match up your notched corners.

This part can be a tad confusing, but stick with me. You will open the notched edge, match the side seam with the bottom seam, creating a straight edge. Pin this edge in place.


Repeat on the second corner, creating your boxed edge. Stitch using a 1/2in seam allowance. (If you still need clarification on this step, please refer to the Fabric Bin tutorial. I used the same technique for the bins and it's explained in a little more detail.)

Press along the topstitched lines on the sides and bottom, creating a boxed shape for your bag.

Repeat all these steps for the inner panel pieces. The only change will be that when you press your topstitched lines on the inner panels, you will do so with the bag turned wrong side out.

With the inner/lining piece still WRONG side out & the outer piece RIGHT side out, place the outer piece down inside the lining. Match up your side seams and corners carefully. Pin your side seams in place.

Before stitching, you'll need to place your long straps and small Velcro strap pieces between the layers.
For the long straps, lay them on top of your bag how you want them positioned to make sure they're facing the right way and not twisted. NOTE: This is only and example of how the straps will be laying once tucked between the layers. DON'T pin or sew them like this please! :)

Slip the strap piece between the two layers of your bag and pin in place. I placed mine about 1in from each side of the pocket, with about 1/4in showing above the top edge of the bag.

Flip the bag and repeat these steps to place the second strap. Make sure they match up with the straps from the opposite side.

Now to place/pin the small Velcro strap - I placed mine on the same side as the pocket, but there's not a right or wrong side to put it on. This photo shows how your strap will be positioned once it's sandwiched between the layers. The side with the Velcro should be sandwiched between the layers, facing the LINING side of the bag to be oriented correctly once the bag is turned right side out.

When pinning, center your small Velcro strap between the stitching lines created by the pocket (or just centered if you're using the other side) and pin in place. As with the long straps, I extended the small Velcro strap above the top of the bag by 1/4in.

Leaving a gap for turning on the side opposite the small Velcro strap, stitch around the top of your bag using a 1/2in seam allowance. Make sure to reinforce your start/stop points. Once stitched, carefully turn your bag right side out.

Gently poke out all corners and match up all edges/seams. Along the top edge, you will need to use a chopstick or turning tool to press the seam so that it's completely turned out. Once everything has been turned properly and pressed, pin your turning gap closed.

Staying as close to the edge as you can, topstitch around your top seam. Now you're ready to place the opposite side of Velcro for your small strap. I placed mine about 1in from the top edge, making sure it lined up with the piece on the strap. Pin it and stitch in place.

You're DONE!


Oh, and PS...............

Happy sewing y'all!!!
Make sure to ask for Acorn Trail from Birch Fabrics when it arrives to a quilt shop near you!
Thank you to Christina for the inspiring tutorial! We're excited to make that skirt too!

Just wondering if you can share at all when the skirt tutorial will be available? And will it be on this blog or somewhere else? My girl NEEDS one like right now :)
ReplyDeleteLay out half of the 3" squares using the picture below as a guide. Large Tote Bags
ReplyDeleteThanks for your information about your knowledge sharing with us. I'm Vashikaran specialist best astrologer in the would with astrologi team
ReplyDelete
ReplyDeleteVashikaran specialist
vashikaran specialist in delhi
vashikaran specialist in jaipur
kundli dosh
vastu shastra
love marriage specialist
lottery number specialist
vashikaran astrologer
Helpful blogging. As of now I've visited a few connections you gave in your rundown. All the connections are exceptionally viable. I'd prefer to see all the more such excellent connections from you by this posting.
ReplyDeleteRegards,
Law dissertation
Amazing blog helpful information thanks for sharing. Roofers in Falkir
ReplyDeleteI was trying to look for the magnetic hijab pin on their website but I couldn't find it :( love these styles btw!! I'm a new muslim and I decided to start wearing education logo design services the hijab too so I'm so new to everything!! So I love how your tutorials are so easy to follow!!
ReplyDeleteThe Back To School Book Tote is a practical and stylish accessory for students heading back to their academic journey. This tote bag offers ample space to carry books, notebooks, and other essentials, making it a must-have for students. Designed with both functionality and aesthetics in mind, the Back To School Book Tote incorporates the expertise of a top-notch UI UX design agency, ensuring a user-friendly and visually appealing design. The result is a trendy and functional tote bag that seamlessly blends style and practicality for students of all ages.
ReplyDeleteWoW, nice designing, awesome art work impressive. Thanks for sharing this blog. Now it's time to avail https://www.manchesterairporttrips.com/ for more information.
ReplyDeleteAmazing blog. Thanks for sharing the making of bag with hands it seems so easy to make in home. Keep it up good work. Now it's time to avail https://hcedubai.com/ for more information.
ReplyDeleteI am pretty much impressed with your good work. You put really very helpful information. Keep it up. Now it's time to avail https://alfaraeenah.com// for more information.
ReplyDeleteThis comment has been removed by the author.
ReplyDeleteBoost your online visibility and drive organic traffic with top-notch SEO services right in your neighborhood! Our expert team specializes in local SEO strategies tailored to businesses like yours. Get personalized attention and tangible results that propel your website to the top of search engine rankings.
ReplyDeletehttps://techobusiness.com/seo-services/ or more information.
Creating a personalized "Back to School Book Tote" is a fun and practical project for students gearing up for a new academic year. Whether you're heading to design school or simply need a sturdy tote for your essentials, a DIY book tote combines style and utility. For design students working on CAD projects, it's essential to carry a reliable laptop for on-the-go productivity. Pair your customized tote with one of the best laptops for SolidWorks to ensure seamless project work and efficient rendering. With the right tools and accessories, you're set for a productive and creative school year!
ReplyDelete